A Warm Welcome to Your New Favorite Holiday Treat!
The holidays bring a special kind of magic. I remember as a child, the smell of cookies baking filled our home, a tradition passed down through generations. These moments of creating and sharing homemade treats are what truly make the season special. This year, imagine delighting your family and friends with a dessert that’s not just delicious, but also visually enchanting and easier to make than you think. Get ready to create some amazing memories, one bite at a time, with this delightful recipe.
Why You’ll Absolutely Adore These Christmas Tree Shaped Cheesecake Bites
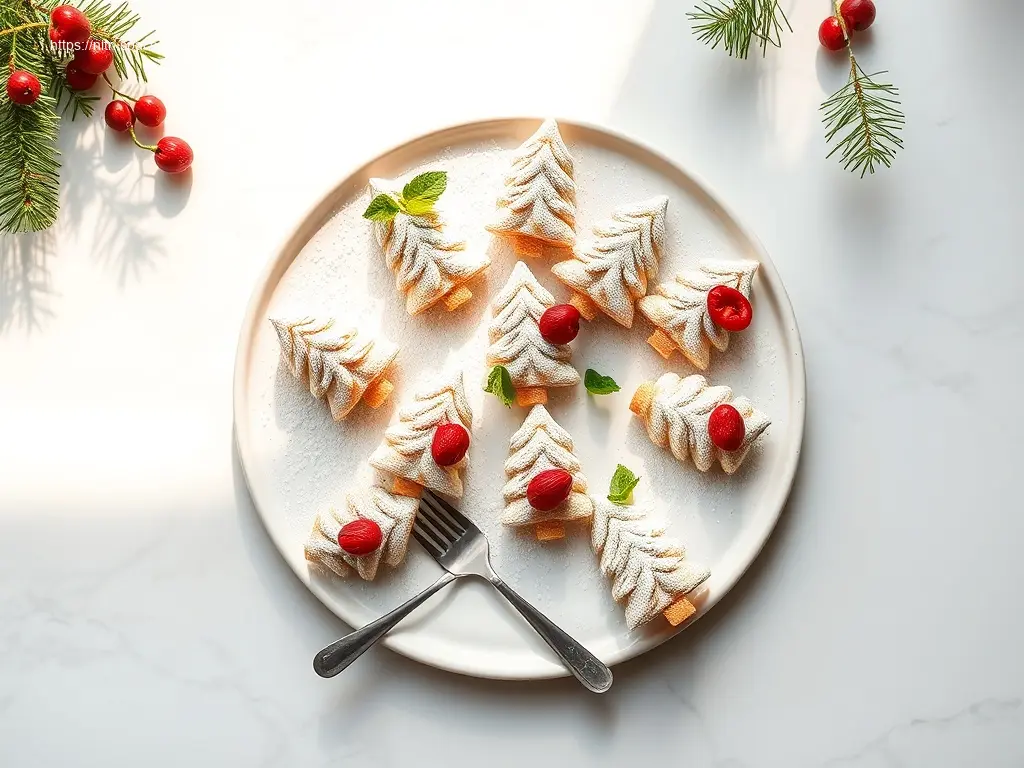
Imagine tiny, adorable Christmas Tree Shaped Cheesecake Bites gracing your holiday dessert table! These treats are perfect for the festive season. You will love them because they are visually appealing and convenient. No cutting, no fuss – just perfectly portioned treats. Each bite offers a rich, creamy cheesecake flavor. They are surprisingly simple to make, even for novice bakers. You can easily customize them with your favorite toppings and decorations.
How to Make Christmas Tree Shaped Cheesecake Bites
Making Christmas Tree Shaped Cheesecake Bites involves preparing a crust, mixing a creamy filling, baking, and then shaping and decorating them into festive trees. It is a fun and rewarding process.
Ingredients of Christmas Tree Shaped Cheesecake Bites
- Creamy Dream Base
- Cream Cheese (full-fat, softened)
- Granulated Sugar
- Large Egg
- Vanilla Extract
- Pinch of Salt
- Crumbly Cookie Crust
- Graham Cracker Crumbs
- Melted Unsalted Butter
- A touch of Brown Sugar (optional)
- Merry Decorations & Toppings
- Green Food Coloring (gel preferred)
- Powdered Sugar (for dusting)
- Sprinkles (red, green, silver, star-shaped)
- Mini Chocolate Chips (for “ornaments”)
- Melted White Chocolate (optional, for drizzling)
- Pretzel Sticks or Candy Canes (for “tree trunks”)
Directions of Christmas Tree Shaped Cheesecake Bites
- Preparing the Delicious Foundation
- Step 1: Preheat your oven to 325°F (160°C). Line mini muffin tins with paper liners.
- Step 2: In a small bowl, combine graham cracker crumbs, melted butter, and brown sugar (if using). Mix well. Press one tablespoon of the mixture firmly into the bottom of each muffin cup.
- Step 3: Bake the crusts for 5 minutes until they are fragrant. Remove from the oven and let them cool slightly.
- Crafting the Creamy Cheesecake Filling
- Step 4: In a medium bowl, beat softened cream cheese and granulated sugar with an electric mixer until the mixture is smooth and creamy.
- Step 5: Mix in the large egg and vanilla extract until they are just combined. Do not overbeat the mixture.
- Step 6: Gently fold in green food coloring until you reach your desired shade of green.
- Baking and Shaping the Holiday Magic
- Step 7: Spoon the cheesecake mixture evenly into the muffin cups over the cooled crusts. Fill each cup almost to the top.
- Step 8: Bake for 15-18 minutes, or until the edges are set but the centers are still slightly jiggly.
- Step 9: Cool the cheesecake bites completely on a wire rack. Then, chill them thoroughly in the refrigerator for at least 2-3 hours, or preferably overnight.
- Decorating Your Festive Masterpieces
- Step 10: Gently remove the “cheesecake bites” from the muffin tins.
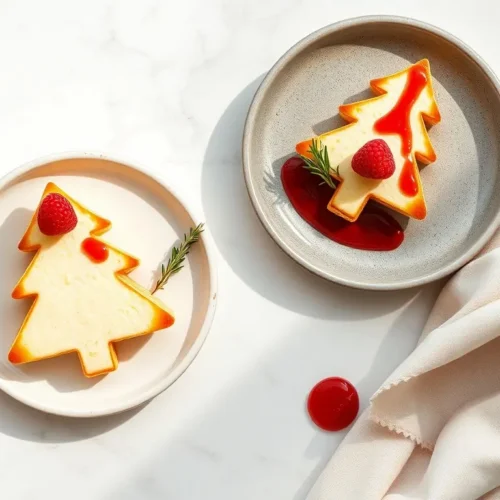
- Step 11: To create a “tree” shape, use a small, sharp knife to carefully trim each bite into a cone shape. You can also use a tree-shaped cookie cutter if you have one for a more uniform look.
- Step 12: Insert a pretzel stick or a small piece of candy cane into the base of each cheesecake tree for the “trunk.”
- Step 13: Decorate with sprinkles, mini chocolate chips, and a dusting of powdered sugar to look like snow. Drizzle with melted white chocolate if you wish.
How to Serve Christmas Tree Shaped Cheesecake Bites
Arrange these festive bites on a tiered dessert stand for a stunning display. You can also serve them on a festive platter dusted with powdered sugar to mimic snow. Offer them alongside hot cocoa, spiced cider, or a good cup of coffee for a complete holiday treat.
How to Store Christmas Tree Shaped Cheesecake Bites
Store these cheesecake bites in an airtight container in the refrigerator for up to 3-4 days.
Tips to Make Christmas Tree Shaped Cheesecake Bites
- Ensure all cold ingredients, especially cream cheese, are at room temperature before you start. This helps create a smooth batter.
- Do not overmix the batter once you add the egg. Overmixing can incorporate too much air and cause cracks during baking.
- Chill the cheesecake bites thoroughly before attempting to shape and decorate them. This makes them firm and easier to handle.
- Use a small, sharp paring knife for precise cuts when shaping the trees.
- You can practice shaping on one or two bites first if you are nervous.
- Consider using a small, sharp, metal Christmas tree cookie cutter for a super uniform look.
Variation
- Peppermint Forest: Add a touch of peppermint extract to the cheesecake mixture and crush candy canes for topping.
- Chocolate Evergreen: Swirl in melted chocolate to the green cheesecake batter for a rich chocolate flavor.
- Citrus Zest Wonderland: Incorporate orange or lemon zest into the filling for a bright, tangy flavor.
- Berry Bright: Top with fresh cranberries or pomegranate seeds for a burst of color and tartness.
FAQs
Can I make these Christmas Tree Shaped Cheesecake Bites ahead of time?
Yes, you can make these bites 1-2 days in advance. Store them in an airtight container in the refrigerator.
What can I use if I do not have mini muffin tins?
You can use a regular muffin tin, but your bites will be larger. Adjust baking time accordingly. Alternatively, you can bake the cheesecake in a square pan and cut out tree shapes with a cookie cutter after it cools.
How do I prevent my Christmas Tree Shaped Cheesecake Bites from cracking?
Key tips include ensuring cream cheese is soft, not overmixing once the egg is in, and allowing them to cool gradually.
Can I freeze these festive Christmas Tree Shaped Cheesecake Bites?
Yes, they freeze well! Freeze undecorated bites on a baking sheet until solid, then transfer to an airtight container for up to 1 month. Thaw them in the refrigerator before decorating.
What if I do not have green food coloring for my Christmas Tree Shaped Cheesecake Bites?
You can omit it for a classic cheesecake look, or you could try adding a very small amount of matcha powder for a subtle green hue and earthy flavor. This will change the taste profile a bit.
Conclusion: Your Holiday Table Awaits!
There is a huge satisfaction in creating something beautiful and delicious with your own hands. These Christmas Tree Shaped Cheesecake Bites bring that joy and delight. They are perfect for sharing the festive spirit. Make them a new holiday tradition for your family.
So, gather your ingredients, turn on some holiday tunes, and get ready to bake some unforgettable Christmas Tree Shaped Cheesecake Bites that will delight everyone at your table!
Classic Christmas Tree Shaped Cheesecake Bites
Equipment
- Oven
- Mini Muffin Tins
- Paper Liners
- Small Bowl
- Electric Mixer
- Medium Bowl
- Wire Rack
- Small, Sharp Knife
- Christmas Tree-Shaped Cookie Cutter (optional)
- Tiered Dessert Stand or Festive Platter
- Airtight Container
Ingredients
Creamy Dream Base
- 24 oz Cream Cheese (full-fat, softened)
- 1 cup Granulated Sugar (200g)
- 2 Large Egg
- 1 tsp Vanilla Extract
- 1/4 tsp Salt Pinch of
Crumbly Cookie Crust
- 1.5 cups Graham Cracker Crumbs (150g)
- 1/2 cup Melted Unsalted Butter (113g)
- 2 tbsp Brown Sugar (optional)
Merry Decorations & Toppings
- as needed Green Food Coloring (gel preferred)
- as needed Powdered Sugar (for dusting)
- as needed Sprinkles (red, green, silver, star-shaped)
- as needed Mini Chocolate Chips (for "ornaments")
- 1/4 cup Melted White Chocolate (optional, for drizzling)
- 12-16 pieces Pretzel Sticks or Candy Canes (for "tree trunks")
Instructions
Crust Preparation
- Preheat oven to 325°F (160°C) and line 24-30 mini muffin tins with paper liners.
- Combine graham cracker crumbs, melted butter, and optional brown sugar in a small bowl until well mixed.
- Press one tablespoon of the crust mixture firmly into the bottom of each prepared muffin cup.
- Bake crusts for 5 minutes until fragrant, then cool slightly.
Cheesecake Filling
- In a medium bowl, beat softened cream cheese and granulated sugar until smooth and creamy.
- Mix in the egg and vanilla extract until just combined, being careful not to overbeat.
- Gently fold in green food coloring until your desired shade is achieved.
- Spoon the cheesecake mixture evenly over the cooled crusts, filling each cup almost to the top.
Baking & Chilling
- Bake for 15-18 minutes until edges are set but centers are slightly jiggly.
- Cool completely on a wire rack, then chill in the refrigerator for at least 2-3 hours, or preferably overnight.
Shaping & Decorating
- Once chilled, gently remove the cheesecake bites from the muffin tins.
- Use a small knife to trim each bite into a cone or pyramid shape, or use a Christmas tree cookie cutter.
- Insert a pretzel stick or candy cane piece into the base of each cheesecake tree.
- Decorate with powdered sugar, sprinkles, mini chocolate chips, and an optional drizzle of melted white chocolate.
Serving & Storage
- Arrange on a festive platter and serve with holiday beverages.
- Store leftover cheesecake bites in an airtight container in the refrigerator for up to 3-4 days.